Getting Started
- UAV software is a collection of Jupyter Notebooks that are used to develop and test UAV software. The notebooks are organized into a library, and the library is used to create a documentation website and a Python package that can be installed with
piporconda(see nbdev template for an example) - Documentation is automatically generated using nbdev & Quarto and hosted on GitHub Pages. Docs support LaTeX, are searchable, and are automatically hyperlinked (including out-of-the-box support for many packages via
nbdev-index) - Publish packages to PyPI and conda as well as tools to simplify package releases. Python best practices are automatically followed, for example, only exported objects are included in
__all__ - Two-way sync between notebooks and plaintext source code allowing you to use your IDE for code navigation or quick edits
- Tests written as ordinary notebook cells are run in parallel with a single command
- Continuous integration out-of-the-box with GitHub Actions that run your tests and rebuild your docs
- Git-friendly notebooks with Jupyter/Git hooks that clean unwanted metadata and render merge conflicts in a human-readable format
- … and much more!
Install
Python 3.10 venv for Ubuntu 21.04, Ubuntu 20.04 LTS https://www.python.org/downloads/
sudo add-apt-repository ppa:deadsnakes/ppa
sudo apt update
sudo apt install python3.10
Note For Ubuntu 18.04
Deadsnakes/ppa is not hold distribution for Ubuntu 18.04 LTS, so you need to install it manually. Download Python 3.10.0 from https://github.com/conda-forge/miniforge - Linux x86_64 (amd64) For Jetson Nano use Python 3.8.xx - Linux aarch64 (arm64)
Give the script execution permission and run it to install into ~/miniforge3
chmod +x Miniforge3-Linux-x86_64.sh
./Miniforge3-Linux-x86_64.sh
follow the prompts to install
Download UAV from github and create a virtual environment
mkdir repos
cd repos
git clone https://github.com/johnnewto/UAV.git
cd UAV
~/miniforge3/bin/python -m venv 'venv'
source ./venv/bin/activate
pip install --upgrade pip
pip install -e .
Install gstreamer
sudo apt-get install libcairo2 libcairo2-dev libgirepository1.0-dev
sudo apt-get install libgstreamer1.0-dev libgstreamer-plugins-base1.0-dev libgstreamer-plugins-bad1.0-dev gstreamer1.0-plugins-base gstreamer1.0-plugins-good gstreamer1.0-plugins-bad gstreamer1.0-plugins-ugly gstreamer1.0-libav gstreamer1.0-tools gstreamer1.0-x gstreamer1.0-alsa gstreamer1.0-gl gstreamer1.0-gtk3 gstreamer1.0-qt5 gstreamer1.0-pulseaudio
Install gstreamer-python package into the python venv
pip install git+https://github.com/johnnewto/gstreamer-python.gitFor developing you can install a locally editable version from the cloned repository, which will allow you to edit and push/pull updates to and from the remote repository
pip install -e /home/$USER/PycharmProjects/gstreamer-pythonor directly from the remote repository, This command clones the repository into a local directory (usually in a src directory inside your environment’s site-packages directory),
pip install -e git+https://github.com/johnnewto/gstreamer-python.git#egg=gstreamer-pythonInstall Ridgerun GstInterpipe - Building and Installation Guide
follow the instructions
# Clone the latest version of the repository
git clone https://github.com/RidgeRun/gst-interpipe.git
If Using a Basler camera install pylon 7.2.1 Linux for either arm64 or x86_64
# ARM 64
https://www2.baslerweb.com/en/downloads/software-downloads/releasenotes-pylon-7-2-1-linux-arm-x86/
# X86_64
https://www2.baslerweb.com/en/downloads/software-downloads/software-pylon-7-2-1-linux-x86-64bit-debian/
Extract the tar file and follow the instructions in INSTALL to install the Basler SDK
sudo apt-get install ./pylon_*.deb ./codemeter*.debInstall the GStreamer source plug-in for Basler cameras
Install gst-plugin-pylon by following the build instructions
set the following environment variables
export LD_LIBRARY_PATH=$LD_LIBRARY_PATH:/opt/pylon/libTo add the to the .bashrc file
echo "export LD_LIBRARY_PATH=$LD_LIBRARY_PATH:/opt/pylon/lib" >> ~/.bashrcFinally, test for proper installation:
gst-inspect-1.0 pylonsrcProblems with avdec_h264 running on the jetson orin
Run this first
export LD_PRELOAD=/usr/lib/aarch64-linux-gnu/libgomp.so.1Alternativily place in .bashrc
echo 'export LD_PRELOAD=/usr/lib/aarch64-linux-gnu/libgomp.so.1' >> ~/.bashrcNote For Ubuntu 18.04
if you get glib install error such as
Requested 'glib-2.0 >= 2.64.0' but version of GLib is 2.56.4
then run this first
pip install PyGObject==3.42.0Running a example program
cd examples
python run_server_client_gui.py
This script will start a server and client on the same machine. The server will start a gstreamer pipeline and the client will display the video stream. The videosrc is a test pattern of a bouncing ball. 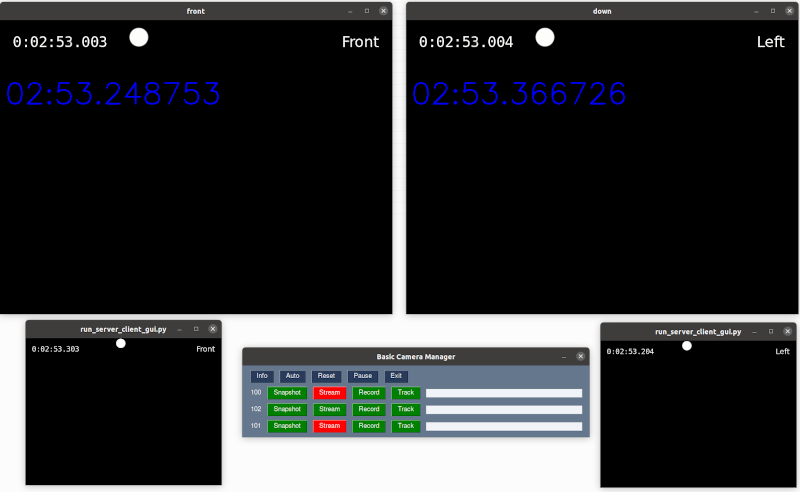
FAQ
Testing in a virtual Machine
https://www.makeuseof.com/how-to-install-qemu-ubuntu-set-up-virtual-machine/
sudo apt install qemu-kvm
sudo apt install virt-manager
Copyright
Copyright © 2024 onward maui63.ai, Inc. Licensed under the Apache License, Version 2.0 (the “License”); you may not use this project’s files except in compliance with the License. A copy of the License is provided in the LICENSE file in this repository.